Frank.
over the wall..again!!
Moderators: ClaytonSpeed, balmy
-
Uncle Frank
- FMM Supporter

- Posts: 2790
- Joined: Wed Jun 06, 2007 9:58 pm
- Location: Isle of Wight
- Contact:
Hi Stu, looks like you`ve really got the bug now  , i`ll say this for you mate...you don`t mess about...straight out with the grinder
  are you using a decent rust killer on that surface rust?, over the last 25 years that has been my pet hate..(rust), i have tried all sorts or weird and wonderful treatments, most of which to be honest are a complete waste of time :roll: , in the end the only sure way is to cut it out completely but if you can`t do that i always try to spot blast the worst of it, then treat it with a good anti rust primer, such as Wurth rust stop, or if that is unavailable Davids isopon Zinc 182 is ok, also never put filler directly over rust that is a complete waste of time and effort, it will be back in no time
  , looks like a pretty sound motor apart from the obvious scabs, which you always get with mk3`s , is it Vermilion or Flamenco red?, mk3`s Look good with Alleycat or Minilight alloys on, when Ben picks these photos up there are some shots of my old mk3 wearing Alleycats and Revolutions at different times over the years i had her ...food for thought eh!!
Frank.
Frank.
-
stuthegasman

- FMM Supporter
- Posts: 1567
- Joined: Tue Jun 05, 2007 8:01 am
- Location: cumbria
thanks Frank to be honest I can't believe the difference between the 2 mk3s my blue one had very little in the way of rust and certainly no rot where as this one has little rust scabs all over the place in the middle of panels even one in the centre of the rear of the roof also on the scuttle panel the arches are a bit of a mess where the chrome trims have been stick on ones on here next time I think) to be honest I was going to patch her up and sell her on as she has about 5 months t&t but I don't believe in using lots of filler and fibre glass to hide things my welding isn't the best but at least i'm filling the holes with metal, the front panel is holed on the lip just under where the grill sits the tricky bit will be making a patch to fit the spare wheel well......
I have used the rust inhibitors in the past the ones that turn any remaining rust to black I don't think you can ever get rid of it unless as you say you cut it out which is what I have done on the wing tip not sure about a full repaint but theres not a panel on it that doesn't need some sort of attention so we'll have to see on the plus side the A posts are as good as new so are the spring hangers and all the floor and inner wings so i'm not too sure why the top has suffered so badly maybe lack of care from previous owners not touching up scratches etc and just letting them rot ha ho it keeps me out of trouble so the wife says
i'll keep you all posted
stu
by the way I think it's vermillion but not too sure
I have used the rust inhibitors in the past the ones that turn any remaining rust to black I don't think you can ever get rid of it unless as you say you cut it out which is what I have done on the wing tip not sure about a full repaint but theres not a panel on it that doesn't need some sort of attention so we'll have to see on the plus side the A posts are as good as new so are the spring hangers and all the floor and inner wings so i'm not too sure why the top has suffered so badly maybe lack of care from previous owners not touching up scratches etc and just letting them rot ha ho it keeps me out of trouble
i'll keep you all posted
stu
by the way I think it's vermillion but not too sure
-
Clan Chieftain

- Posts: 1305
- Joined: Tue Jun 05, 2007 6:31 pm
- Location: Motherwell
- Contact:
8) maybe with it lying off the road for 12 years with all sorts lying on top of it and against it didnt help plus dougie used it as an every day car for 2 years but as you say the chassis and floor and a posts are solid.you werent long in making a start. have you got the bumpers changed over yet........keep in touch..larry
-
stuthegasman
- FMM Supporter
- Posts: 1567
- Joined: Tue Jun 05, 2007 8:01 am
- Location: cumbria
No not swapped the bumpers yet larry, but that would certainly explain the body rust but it ain't a problem i'll just work my way round 1 panel at a time might need that rear arch though if Ray can find it I managed to put a screwdriver through it when I was going round it checking it out, but theres no rush tomorrow will do 
no need now the rear arch is repairable fingers crossed
stu
no need now the rear arch is repairable fingers crossed
stu
Last edited by stuthegasman on Tue Oct 23, 2007 8:21 pm, edited 1 time in total.
-
Uncle Frank
- FMM Supporter
- Posts: 2790
- Joined: Wed Jun 06, 2007 9:58 pm
- Location: Isle of Wight
- Contact:
-
stuthegasman
- FMM Supporter
- Posts: 1567
- Joined: Tue Jun 05, 2007 8:01 am
- Location: cumbria
Definately Frank at least you can stand/kneal down in front of the car  any ideas for the bottom of the boot
I think 1 panel at a time is the way to go you can get too carried away ripping into all the car at once usually I find by the time you've sorted a couple of panels the whole job looks a lot better and you don't loose heart so much whereas if you grind up the whole car you just make 1 big mess for yourself it has just had £700 spent on replacing the o/s sill etc and that has been done very well also they have stonechipped both sills but at least it's not covered in nasty black underseal which is usually hiding a multitude of sins..... oooh i'm getting all worked up again might have to go out and kill some rust
stu
-
stuthegasman
- FMM Supporter
- Posts: 1567
- Joined: Tue Jun 05, 2007 8:01 am
- Location: cumbria
-
Uncle Frank
- FMM Supporter
- Posts: 2790
- Joined: Wed Jun 06, 2007 9:58 pm
- Location: Isle of Wight
- Contact:
-
stuthegasman
- FMM Supporter
- Posts: 1567
- Joined: Tue Jun 05, 2007 8:01 am
- Location: cumbria

Well done Stu, your keen man! I'm doing the same with the van with one panel at a time. So far the front o/s wing is off and cleaned up ready for welding but I havent got a mig welder yet so am stuck just now lol. My new sills came today so cant wait to fit them.....>not!
Beauty with brains behind it!
-
stuthegasman
- FMM Supporter
- Posts: 1567
- Joined: Tue Jun 05, 2007 8:01 am
- Location: cumbria
I use a cheap gassless mig it's not great at seam welding but it's ok for spot welding so I just weld a row of spots and then join in between it's amazing how good a job can look once it's ground back like I said earlier it's better to fill a hole with new metal however pretty it does or does not look you can just get away with a thin skim of filler to hide the repair I am certainly no expert but I enjoy doing it and you seem to get better at it and more confident the more you do it... my sister turned up tonight just as I stuck a screwdriver through the rear corner of the back wing next to the rear light she was horrified and said "ooh you'll be scrapping it then eh ? " no chance was my reply just another patch to weld in and she'll be fine good luck with the sills if you need any advice don't ask me speak to Frank he's the man
cheers stu
cheers stu
-
Uncle Frank
- FMM Supporter
- Posts: 2790
- Joined: Wed Jun 06, 2007 9:58 pm
- Location: Isle of Wight
- Contact:
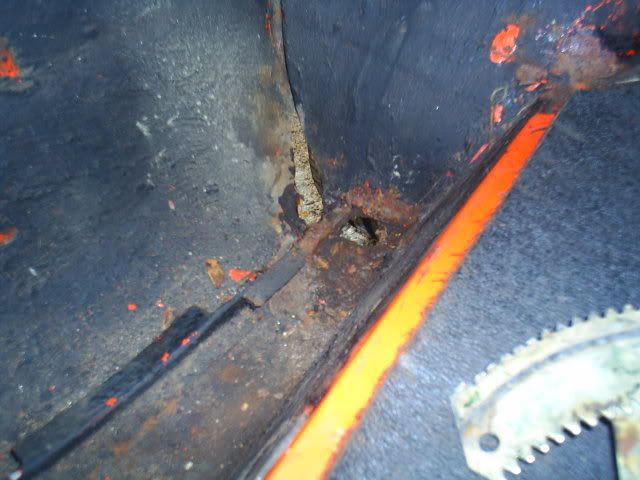
That looks like good old holts brush on underseal!!, although as far as i can see the metal around the area looks pretty sound , try cleaning away the underseal with paraffin, then you can see where the rust ends and the good steel begins, looks like you could get away with a fairly small patch about 3" square with a new 1" hole bored in the middle for the bung, make a card template first then transfer that onto a suitable bit of steel, check the fit then mark out around the patch allowing about a 1/4" overlap all round, then cut out the rusted area about 1/4" inside the mark you have made in the floor, clean up around the edges until it`s nice and shiny, spray a little zinc spray around the edges then clamp your patch in place and weld away , if you are keen you could try welding it from underneath, in which case you can easily buzz off the welds with a grinder and then all you need to do inside is prime the repair then carefully seal it with a good PU sealer then do the same underneath.
Keep up the good work mate, all the best Frank.
Keep up the good work mate, all the best Frank.
-
stuthegasman
- FMM Supporter
- Posts: 1567
- Joined: Tue Jun 05, 2007 8:01 am
- Location: cumbria
-
The General

- Posts: 2436
- Joined: Tue Jun 05, 2007 10:59 am
- Location: Motherwell
- Contact:

-
stuthegasman
- FMM Supporter
- Posts: 1567
- Joined: Tue Jun 05, 2007 8:01 am
- Location: cumbria